Daisy Manual
Introduction
Daisy is very simple, which makes her very easy to use and fix. I have broken this manual into four sections:
- Basic use
- Routine chores like changing the gas cylinder or topping up the water
- Troubleshooting
Basic Use
This section covers everything you will need for a weekend, assuming that everything has been topped up or emptied (see Routine Chores).
Driving
Daisy is easy to drive but note:
Daisy has two-wheel drive (usually the best), four-wheel drive (handy in snow or mud) and low ratio (extreme conditions or pulling something). Do not use low ratio on tarmac because it can cause damage.
The indicator is on the right.
The sat-nav as a rear view camera which is not automatic and not great at night.
Turn off the gas at the cylinder before driving as a safety measure.
The fridge can be turned on when driving.
Parking Up
There is a spirit level and a pair of ramps (stored n the gas cupboard) to get Daisy level. The orange hook-up lead connects to a socket under a rectangular flap at the rear. Once connected, the habitation battery is being charged and the mains sockets are available. Electrics are controlled through the master switch in the stairwell and the console panel.
Electrics
Power Up – The master switch is on the stairwell.Auto cut out – Daisy has a voltage cut out feature. If the voltage falls below x volts then the power will cut out to stop the habitation battery becoming completely flat as this can damage it.
Volt Meter – Full charge is about 13.4v. A written table stuck on the inside of the cupboard door converts voltage into remaining power.
The Control Panel above the heater – on the silver board are 4 circuit switches for lights, USB port, AUX and water pumps under the missile cover. Aux covers the amplifier and cupboard lights. All lights have an individual switch.
Gas on – two switches and a yellow light. See “gas” below.
Water Heater – the black switch with the red light turns on the water heater. It starts with a roar and you have hot water in 10 minutes.
Fan Assist – the old-fashioned rotary switch operates a small fan to help the gas heater circulate air faster if desired.
Gas
Master valve at cylinder - Open the door next to the entrance to access the gas storage area. Open the valve (anti-clockwise) to start the gas supply. Turn off (clockwise) before driving away
Turn on gas- With the master valve open at the cylinder (see above), turn one switch on and hold the other down for a second. The gas supply is now available for the heater, hob, water heater and fridge.
Heater - Press down on the control knob and turn the dial clockwise. You should see an orange light inside the heater flash and the gas ignite. Once ignited, turn the knob to the desired heat setting. Optionally you can use the round antique knob on the centre panel to turn on a small fan and get the hot air moving. This is a little noisy, but helps get Daisy heated quickly.
Hob – Turn and hold in the hob gas controls while pressing the ignitor button or using a match. There is an extractor fan which is useful.
Water Heater - the black switch with the red light turns on the water heater. It starts with a roar and you have hot water in 10 minutes.
Fridge – The fridge should be run on mains electricity when hooked up, but can run on gas. Switch the gas button on the fridge. You should hear the igniter click and then the fridge starts on gas.
Water
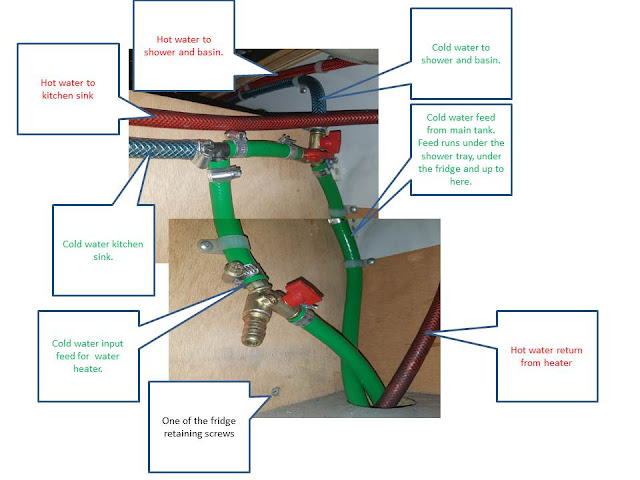
A single switch on the silver centre panel turns on two pumps to supply water from the main tank to the shower, toilet basin and kitchen sink and a separate pump pulling drinking water to the kitchen sink tap.
Toilet
To flush – Press and twist the switch on the right (when seated).
Mains Devices
Heater – electric heater saves gas
Romoska – a quirky but very effective Czech cooker which can heat up ready meals.
Kettle
Extension Lead – so you can use the Ramoska outside.
Tank Heater – There is an aquarium heater in the main water tank with a plug under the main seat. It is useful in extreme conditions to stop ice forming. Ice can clog the pump which stops the shower from working.
Routine Chores
Replenish Drinking Water – Open door to the right of sink. Release bungie clips and lift water container free. Remove pump. Fill at tap and replace. It is easiest if you put the container in place at a slight angle and keep hold of the bungie clips. That gives some space to re-fix the bungies.
Top up main tank – With the pumps running, indicator lights on the lower panel show the status. The white filler cap is removed (key needed from main key bunch). The tank can be refilled using a hose, or a hose attached to a special filler cap stored with the gas cylinders.
Empty Toilet Waste– The key for the toilet is on the supplemental key chain. Open the small door on the driver’s side rear. There is a grey plastic handle. Place one hand on the handle and press down on the yellow retaining flap below the handle then pull out the waste unit. It is safe to carry without spilling. On top is a fold-out curved pipe with a yellow cap. Fold the pipe out and remove the cap to empty. Once cleaned with water, add a little water and unit of bowl cleaner, stored in the interior cupboard by the main door.
Top up toilet flush – Swing out the arm above the waste unit (see above). Remove cap and fill, adding toilet bowl cleaner.
Change Gas Cylinder – This takes a little practice. Close the cylinder valve and undo the quick release. Removing and replacing the cylinder from the cupboard takes some practice!
Troubleshooting
No Power
Is the master switch in the entrance well on? Are any electrics working? Try the toilet light and flush as they have no other switches. If the master switch is on then the indicator lamp built into it should glow.
If not then the likely causes are:
1. The battery is somewhat flat and the low voltage protection has cut in. Lift the seat above the battery. If the green LED is not lit then the low voltage protection may have cut in. There is a small screw on the device to adjust the kick-in voltage. A small adjustment should restore power and prove that the problem is just a need for charge. Go for a long drive or plug in the 240v hook-up which will start the recharge process. If power is not restored then go to #2.
2. Fuse F1 has blown. This fuse protects the master switch, the low voltage cut-out and a relay which allows power to flow to the habitation circuit as well as acting as the habitation master fuse. Check for a short circuit.
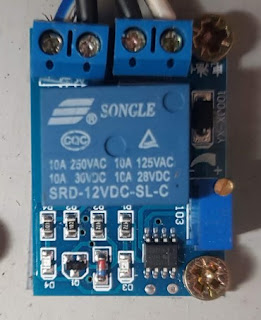
3. The low voltage protection circuit has failed. Bypass it by connecting wire A15 directly to relay R2.
4. The battery is completely flat or failed. Use the digital battery charger for a slow recharge.
Lights Flicker: The battery is somewhat flat and the low voltage protection has cut in. That turns the lights off, and with a fractionally smaller load the voltage is just high enough to reset the low voltage protection. But as soon as it resets the circuit cuts in again. See #1 above.
Some circuits work: A blade fuse in the fuse box has blown. Check circuit and replace fuse.
1. The battery is somewhat flat and the low voltage protection has cut in. Lift the seat above the battery. If the green LED is not lit then the low voltage protection may have cut in. There is a small screw on the device to adjust the kick-in voltage. A small adjustment should restore power and prove that the problem is just a need for charge. Go for a long drive or plug in the 240v hook-up which will start the recharge process. If power is not restored then go to #2.
2. Fuse F1 has blown. This fuse protects the master switch, the low voltage cut-out and a relay which allows power to flow to the habitation circuit as well as acting as the habitation master fuse. Check for a short circuit.
3. The low voltage protection circuit has failed. Bypass it by connecting wire A15 directly to relay R2.
4. The battery is completely flat or failed. Use the digital battery charger for a slow recharge.
Lights Flicker: The battery is somewhat flat and the low voltage protection has cut in. That turns the lights off, and with a fractionally smaller load the voltage is just high enough to reset the low voltage protection. But as soon as it resets the circuit cuts in again. See #1 above.
Some circuits work: A blade fuse in the fuse box has blown. Check circuit and replace fuse.
No water: Listen for the pump in the tank which you are drawing water from - either drinking water by the sink or the main tank under the forward-facing bench seat. If only one pump is running there is an electrical fault of failed pump, or possibly the water has frozen in the pump.
The solutions for a frozen pump are to plug in the aquarium heater in the main tank and be patient and to raise the temperature. If the toilet flush is the frozen then add screen wash to the tank.
If the pump is running then check the water level indicator, topping up the tank if necessary. Ice could make the level indicator unreliable.
A pipe is frozen. Wait for warmer weather.
A pipe has become disconnected from the pump, the pump has failed but the motor is still running. Access the pumps as follows.
Drinking water: Lift the pump from the tank.
Toilet. Pull out the inside of the toilet roll holder. Fish around in the cistern to locate and unscrew the pump.
Main tank. If the pump is operating then set the valves by the tank to let the pump direct the water to an outlet under Daisy. If not, remove the two retaining straps and perch the tank on the seat edge to that the access port can be opened without a flood. Access the pump through the access port. There is a large bung inside the tank which can be removed to drain the tank through a hole in the floor.
No Gas: Cylinder empty.
Cylinder valve closed.
Gas valve not on.
Isolation valves in cupboard with drinking water tank closed.
No Mains Power: Camp site hook-up not working. This is common - try to reset it or find another point.
Mains fuse tripped. Reset fuse by battery.
Hook-up faulty.
Comments
Post a Comment